2021-22 世界质量报告(World Quality Report)

前言

2021-22 世界质量报告(World Quality Report 简称 WQR)是由 Micro Focus,Capgemini 和 Sogeti 三家公司合作的来分析软件质量和测试趋势在全球范围内唯一的报告。

这份报告共采访了 1750 名高管和专业人士。从最高管理层到 QA 测试经理和质量工程师,涵盖了来自全球 32 个国家的 10 个行业。

图片 0

世界质量报告(WQR)是一项独一无二的全球研究,今年的调查强调了新部署方法中不断变化的受大流行影响的应用程序需求的影响,以及 QA 对敏捷和 DevOps 实践的采用,AI 的持续增长。

作为测试关注这类软件质量报告可以帮助我们快速了解软件测试行业的现状和趋势。

五大主题

WQR 的一个关键信息:在新冠疫情依旧的今天,我们看到了数字化转型的融合以及敏捷和 DevOps 实践的实时采用。此外,QA 正在成为采用敏捷和 DevOps 实践的领导者,为团队提供工具和流程以促进整个软件生命周期(SDLC)的质量。

WQR 围绕关键发现和趋势突出了五个特定主题:

  1. 新冠疫情对 QA 组织和软件测试的影响
  2. 数字化转型与 DevOps 和敏捷采用的实时融合以及 QA 在其中的日益重要的作用
  3. 地理上分散的团队在跨环境部署应用程序时专注于业务成果
  4. 人工智能 (AI) 增强了敏捷和 DevOps 在所有团队中培养不断增长的质量责任文化
  5. 使用 AI 驱动的持续测试和质量管理工具来解决客户体验优先事项和快速变化的受疫情影响的要求

Read More

Polaris - 静态代码分析

这可能是中文网里介绍Polaris最详细的文章了

什么是 Polaris?

Polaris - 托管静态应用程序软件测试(SAST)工具的 SaaS 平台,它是用于分类和修复漏洞并运行报告的 Web 站点。
SAST - 一种对源代码分析或构建过程中去寻找安全漏洞的工具,是一种在软件开发的生命周期(SDLC)中确保安全的重要步骤。
Coverity - Coverity 是 Synopsys 公司提供的原始静态应用软件测试 (SAST) 工具。Polaris 是 Coverity 的 SaaS 版本。
Synopsys - 是开发 Polaris 和其他软件扫描工具的公司,比如 BlackDuck 也是他们的产品。

Polaris 支持哪些语言?

C/C++
C#
Java
JavaScript
TypeScript
PHP
Python
Fortran
Swift
...and more

Polaris SaaS 平台

通常如果你的组织引入了 Polaris 的 SaaS 服务,你将会有如下网址可供访问 URL: https://organization.polaris.synopsys.com

然后登录,你就可以给自己的 Git Repository 创建对应的项目了。

建议:创建的项目名称与 Git Repository 的名称一致。

Polaris 如何进行漏洞扫描?

Polaris 安装

在进行 Polaris 扫描之前,你需要先下载并安装 polaris。

如果你的 Polaris server URL 为:POLARIS_SERVER_URL=https://organization.polaris.synopsys.com

下载连接为:$POLARIS_SERVER_URL/api/tools/polaris_cli-linux64.zip

然后将下载到本地的 polaris_cli-linux64.zip 进行解压,将其 bin 目录添加到 PATH 中。

Polaris YAML 文件配置

在进行扫描之前,你需要为你的项目创建 YAML 文件。默认配置文件名为 polaris.yml,位于项目根目录。如果你希望指定不同的配置文件名,你可以在 polaris 命令中使用 -c 选项。

在项目根目录运行 polaris setup 以生成通用的 polaris.yml 文件。

运行 polaris configure 以确认你的文件在语法上是正确的并且 polaris 没有任何问题。

Capture - 捕获

YAML 配置文件可以包含三种类型的 Capture:

  • Build(构建) - 运行构建命令,然后分析结果
  • Filesystem(文件系统) - 对于解释型语言,提供项目类型和要分析的扩展列表
  • Buildless - 对于一些可以使用依赖管理器的语言,比如 maven
Languages Build Options
C, C++, ObjectiveC, Objective C++,Go, Scala, Swift 使用 Build 捕获
PHP, Python, Ruby 使用 Buildless 或 Filesystem 捕获
C#, Visual Basic. 如果想获得更准确的结果使用 Build 捕获;如果寻求简单使用 Buildless 捕获
Java 如果想获得更准确的结果使用 Build 捕获;如果寻求简单使用 Buildless 捕获
JavaScript,TypeScript 使用 Filesystem 捕获;如果寻求简单使用 Buildless 捕获

Analyze - 分析

如果你正在扫描 C/C++ 代码,则应包括此分析部分以充分利用 Polaris 的扫描功能:

analyze:
mode: central
coverity:
cov-analyze: ["--security","--concurrency"]

Polaris YAML 示例文件

Read More

Git 常用命令备忘录

不管是对于 Git 的初学者还是经常使用 Git 的码农们,在日常工作中难免会有遇到有的命令一时想不起来。不妨将下面总结的一些 Git 常用命令及技巧收藏或打印出来,以备需要的时候可以很快找到。

git config

# 检查 git 配置
git config -l

# 设置你的 git 提交 username 和 email
# 例如:对于公司里项目
git config --global user.name "Your Name"
git config --global user.email "your_email@organization.com"

# 例如:对于个人的 GitHub 项目
git config user.name "Your Name"
git config user.email "your_emailn@gmail.com"

# 使用 HTTP/HTTPS 避免每次输入密码
git config --global credential.helper cache

git init

# 初始化一个仓库
git init

git add

# 将文件添加到暂存区
git add file_name

# 将所有文件添加到暂存区
git add .

# 仅将某些文件添加到暂存区, 例如:仅添加所有以 'test*' 开头的文件
git add test*

git status

# 检查仓库状态
git status

git commit

# 提交更改
git commit

# 提交带有消息的更改
git commit -m "This is a commit message"

git log

# 查看提交历史
git log

# 查看提交历史和显示相应的修改
git log -p

# 显示提交历史统计
git log --stat

# 显示特定的提交
git show commit_id

# 以图形方式显示当前分支的提交信息
git log --graph --oneline

# 以图形方式显示所有分支的提交信息
git log --graph --oneline --all

# 获取远程仓库的当前提交日志
git log origin/master

git diff

# 在使用 diff 提交之前所做的更改
git diff
git diff some_file.js
git diff --staged

git rm

# 删除跟踪文件
git rm file_name

git mv

# 重命名文件
git mv old_file_name new_file_name

git checkout

# 切换分支
git checkout branch_name

# 还原未暂存的更改
git checkout file_name

git reset

# 还原暂存区的更改
git reset HEAD file_name
git reset HEAD -p

git commit --amend

# 修改最近的提交信息
git commit --amend

# 修改最近的提交信息为:New commit message
git commit --amend -m "New commit message"

git revert

# 回滚最后一次提交
git revert HEAD

# 回滚指定一次提交
git revert commit_id

git branch

# 创建分支
git branch branch_name

# 创建分支并切到该分支
git checkout -b branch_name

# 显示当前分支
git branch

# 显示所有分支
git branch -a

# 检查当前正在跟踪的远程分支
git branch -r

# 删除分支
git branch -d branch_name

git merge

# 将 branch_name 合并到当分支
git merge branch_name

# 中止合并
git merge --abort

git pull

# 从远程仓库拉取更改
git pull

git fetch

# 获取远程仓库更改
git fetch

git push

# 推送更改到远程仓库
git push

# 推送一个新分支到远程仓库
git push -u origin branch_name

# 删除远程仓库分支
git push --delete origin branch_name

git remote

# 添加远程仓库
git add remote https://repository_name.com

# 查看远程仓库
git remote -v

# 查看远程仓库的更多信息
git remote show origin

Git技巧和窍门

清理已合并分支

清理已经合并的本地分支

git branch --merged master | grep -v "master" | xargs -n 1 git branch -d

.gitignore

指明 Git 应该忽略的故意不跟踪的文件的文件,比如 .gitignore 如下

# 忽略 .vscode 目录
.vscode/

# 忽略 build 目录
build/

# 忽略文件
output.log

.gitattributes

关于 .gitattributes 请参考

How does SonarQube Community Edition integrate with the project

After you have set up the SonarQube instance, you will need to integrate SonarQube with project.

Because I used the community edition version, it doesn’t support the C/C++ project, so I only demo how to integrate with Maven, Gradle, and Others.

For example, the demo project name and ID in SonarQube are both test-demo, and I build with Jenkins.

Build with Maven

  1. Add the following to your pom.xml file:

    <properties>
    <sonar.projectKey>test-demo</sonar.projectKey>
    </properties>
  2. Add the following code to your Jenkinsfile:

    stage('SonarQube Analysis') {
    def mvn = tool 'Default Maven';
    withSonarQubeEnv() {
    sh "${mvn}/bin/mvn sonar:sonar"
    }
    }

Build with Gradle

  1. Add the following to your build.gradle file:

    plugins {
    id "org.sonarqube" version "3.3"
    }

    sonarqube {
    properties {
    property "sonar.projectKey", "test-demo"
    }
    }
  2. Add the following code to your Jenkinsfile:

    stage('SonarQube Analysis') {
    withSonarQubeEnv() {
    sh "./gradlew sonarqube"
    }
    }

Build with Other(for JS, TS, Python, …)

  1. Create a sonar-project.properties file in your repository and paste the following code:

    sonar.projectKey=test-demo
  2. Add the following code to your Jenkinsfile:

    stage('SonarQube Analysis') {
    def scannerHome = tool 'SonarScanner';
    withSonarQubeEnv() {
    sh "${scannerHome}/bin/sonar-scanner"
    }
    }

More about how to integrate with SonarQube, please visit your SonarQube instance documentation: http://localhost:9000/documentation

Run lcov failed "Can't locate JSON/PP.pm in @INC ..."

When execute command: lcov --capture --directory . --no-external --output-file coverage.info to generate code coverage report, I encountered the following error:

$ lcov --capture --directory . --no-external --output-file coverage.info
Capturing coverage data from .
Can't locate JSON/PP.pm in @INC (@INC contains: /usr/local/lib64/perl5 /usr/local/share/perl5 /usr/lib64/perl5/vendor_perl /usr/share/perl5/vendor_perl /usr/lib64/perl5 /usr/share/perl5 .) at /usr/local/bin/geninfo line 63.
BEGIN failed--compilation aborted at /usr/local/bin/geninfo line 63.
sh-4.2$ perl -MCPAN -e 'install JSON'
Can't locate CPAN.pm in @INC (@INC contains: /usr/local/lib64/perl5 /usr/local/share/perl5 /usr/lib64/perl5/vendor_perl /usr/share/perl5/vendor_perl /usr/lib64/perl5 /usr/share/perl5 .).
BEGIN failed--compilation aborted.

Can’t locate CPAN.pm

fixed this problem “Can’t locate CPAN.pm” by running the command yum install perl-CPAN

sh-4.2$ sudo perl -MCPAN -e 'install JSON'
[sudo] password for sxp:
Can't locate CPAN.pm in @INC (@INC contains: /usr/local/lib64/perl5 /usr/local/share/perl5 /usr/lib64/perl5/vendor_perl /usr/share/perl5/vendor_perl /usr/lib64/perl5 /usr/share/perl5 .).
BEGIN failed--compilation aborted.
sh-4.2$ sudo yum install perl-CPAN

Then run sudo perl -MCPAN -e 'install JSON' again, it works.

Can’t locate JSON/PP.pm

fixed this problem by copying backportPP.pm to the PP.pm file.

$ cd /usr/local/share/perl5/JSON
$ ls
backportPP backportPP.pm
$ cp backportPP.pm PP.pm

Can’t locate Module/Load.pm

bash-4.2$ geninfo --version
Can't locate Module/Load.pm in @INC (@INC contains: /usr/local/lib64/perl5 /usr/local/share/perl5 /usr/lib64/perl5/vendor_perl /usr/share/perl5/vendor_perl /usr/lib64/perl5 /usr/share/perl5 .) at /usr/local/bin/geninfo line 63.
BEGIN failed--compilation aborted at /usr/local/bin/geninfo line 63.
bash-4.2$

Install perl-Module-Load-Conditional can resolved.

sudo yum install perl-Module-Load-Conditional

Can’t locate Capture/Tiny.pm in @INC

sh-4.2$ lcov --version
Can't locate Capture/Tiny.pm in @INC (@INC contains: /usr/local/bin/../lib /usr/local/lib64/perl5 /usr/local/share/perl5 /usr/lib64/perl5/vendor_perl /usr/share/perl5/vendor_perl /usr/lib64/perl5 /usr/share/perl5 .) at /usr/local/bin/../lib/lcovutil.pm line 13.
BEGIN failed--compilation aborted at /usr/local/bin/../lib/lcovutil.pm line 13.
Compilation failed in require at /usr/local/bin/lcov line 104.
BEGIN failed--compilation aborted at /usr/local/bin/lcov line 104.

Fixed with following command

perl -MCPAN -e 'install Capture::Tiny'

Then run lcov --version back to work.

sh-4.2$ lcov --version
lcov: LCOV version v1.16-16-g038c2ca

Can’t locate DateTime.pm

$ genhtml --help
Can't locate DateTime.pm in @INC (@INC contains: /usr/local/lib64/perl5 /usr/local/share/perl5 /usr/lib64/perl5/vendor_perl /usr/share/perl5/vendor_perl /usr/lib64/perl5 /usr/share/perl5 .) at /usr/local/bin/genhtml line 87.
BEGIN failed--compilation aborted at /usr/local/bin/genhtml line 87.

Need to install the perl module DateTime, On Centos7 run

sudo yum install 'perl(DateTime)'

But this still doesn’t work for me.

Run geninfo command failed

Capturing coverage data from .
Compress::Raw::Zlib version 2.201 required--this is only version 2.061 at /usr/local/share/perl5/IO/Uncompress/RawInflate.pm line 8.
BEGIN failed--compilation aborted at /usr/local/share/perl5/IO/Uncompress/RawInflate.pm line 8.
Compilation failed in require at /usr/local/share/perl5/IO/Uncompress/Gunzip.pm line 12.
BEGIN failed--compilation aborted at /usr/local/share/perl5/IO/Uncompress/Gunzip.pm line 12.
Compilation failed in require at /usr/local/bin/geninfo line 62.
BEGIN failed--compilation aborted at /usr/local/bin/geninfo line 62.
sh-4.2$

Install package Compress::Raw::Zlib fixed.

perl -MCPAN -e 'install Compress::Raw::Zlib'

使用 Gcov 和 LCOV 做 C/C++ 项目的代码覆盖率

本篇分享如何使用 Gcov 和 LCOV 对 C/C++ 项目进行代码覆盖率的度量。

如果你想了解代码覆盖率工具 Gcov 是如何工作的,或是以后需要做 C/C++ 项目的代码覆盖率,希望本篇对你有所帮助。

问题

不知道你没有遇到过和我一样的问题:几十年前的 C/C++ 项目没有单元测试,只有回归测试,但是想知道回归测试测了哪些代码?还有哪些代码没测到?代码覆盖率是多少?今后哪些地方需要提高自动化测试用例?

可能对于接触过 Java 的 Junit 和 JaCoCo 的人来说,没有单元测试应该测不了代码覆盖率吧 … 其实不然,如果不行就没有下文了 :)

现状

市场上有一些工具可以针对黑盒测试来衡量代码覆盖率 Squish Coco,Bullseye 等,它们的原理就是在编译的时候插入 instrumentation,中文叫插桩,在运行测试的时候用来跟踪和记录运行结果。

其中我比较深入的了解过 Squish Coco 它如何使用,但对于大型项目,引入这类工具都或多或少的需要解决编译上的问题。也正是因为有一些编译问题没有解决,就一直没有购买这款价格不菲的工具 License。

当我再次重新调查代码覆盖率的时候,我很惭愧的发现原来正在使用的 GCC 其实有内置的代码覆盖率的工具的,叫 Gcov

前提条件

对于想使用 Gcov 的人,为了说明它是如何工作的,我准备了一段示例程序,运行这个程序之前需要先安装 GCCLCOV

如果没有环境或不想安装,可以直接查看示例仓库的 GitHub 仓库:https://github.com/shenxianpeng/gcov-example

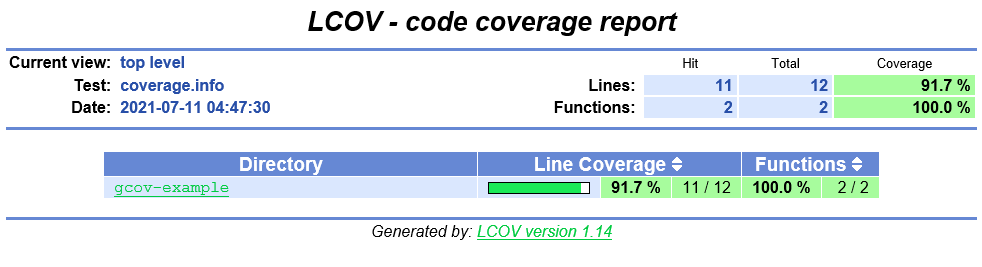
注:主分支 master 下面放的是源码,分支 coverage 下的 out 目录是最终的结果报告。

# 这是我的测试环境上的 GCC 和 lcov 的版本
sh-4.2$ gcc --version
gcc (GCC) 4.8.5 20150623 (Red Hat 4.8.5-39)
Copyright (C) 2015 Free Software Foundation, Inc.
This is free software; see the source for copying conditions. There is NO
warranty; not even for MERCHANTABILITY or FITNESS FOR A PARTICULAR PURPOSE.

sh-4.2$ lcov -v
lcov: LCOV version 1.14
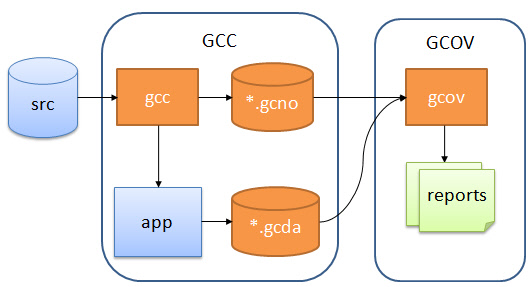
Gcov 是如何工作的

Gcov 工作流程图

flow

主要分三步:

  1. 在 GCC 编译的时加入特殊的编译选项,生成可执行文件,和 *.gcno
  2. 运行(测试)生成的可执行文件,生成了 *.gcda 数据文件;
  3. 有了 *.gcno*.gcda,通过源码生成 gcov 文件,最后生成代码覆盖率报告。

下面就开始介绍其中每一步具体是怎么做的。

1. 编译

第一步编译,这里已经将编译用到的参数和文件都写在了 makefile 里了,只要执行 make 就可以编译了。

make
点击查看 make 命令的输出
sh-4.2$ make
gcc -fPIC -fprofile-arcs -ftest-coverage -c -Wall -Werror main.c
gcc -fPIC -fprofile-arcs -ftest-coverage -c -Wall -Werror foo.c
gcc -fPIC -fprofile-arcs -ftest-coverage -o main main.o foo.o

通过输出可以看到,这个程序在编译的时候添加了两个编译选项 -fprofile-arcs and -ftest-coverage。在编译成功后,不仅生成了 main and .o 文件,同时还生成了两个 .gcno 文件.

.gcno 记录文件是在加入 GCC 编译选项 -ftest-coverage 后生成的,在编译过程中它包含用于重建基本块图和为块分配源行号的信息。

2. 运行可执行文件

在编译完成后,生成了 main 这个可执行文件,运行(测试)它:

./main
点击查看运行 main 时输出
sh-4.2$ ./main
Start calling foo() ...
when num is equal to 1...
when num is equal to 2...

当运行 main 后,执行结果被记录在了 .gcda 这个数据文件里,查看当前目录下可以看到一共有生成了两个 .gcda 文件,每个源文件都对应一个 .gcda 文件。

$ ls
foo.c foo.gcda foo.gcno foo.h foo.o img main main.c main.gcda main.gcno main.o makefile README.md

.gcda 记录数据文件的生成是因为程序在编译的时候引入了 -fprofile-arcs 选项。它包含弧过渡计数、值分布计数和一些摘要信息。

3. 生成报告

make report
点击查看生成报告的输出
sh-4.2$ make report
gcov main.c foo.c
File 'main.c'
Lines executed:100.00% of 5
Creating 'main.c.gcov'

File 'foo.c'
Lines executed:85.71% of 7
Creating 'foo.c.gcov'

Lines executed:91.67% of 12
lcov --capture --directory . --output-file coverage.info
Capturing coverage data from .
Found gcov version: 4.8.5
Scanning . for .gcda files ...
Found 2 data files in .
Processing foo.gcda
geninfo: WARNING: cannot find an entry for main.c.gcov in .gcno file, skipping file!
Processing main.gcda
Finished .info-file creation
genhtml coverage.info --output-directory out
Reading data file coverage.info
Found 2 entries.
Found common filename prefix "/workspace/coco"
Writing .css and .png files.
Generating output.
Processing file gcov-example/main.c
Processing file gcov-example/foo.c
Writing directory view page.
Overall coverage rate:
lines......: 91.7% (11 of 12 lines)
functions..: 100.0% (2 of 2 functions)

执行 make report 来生成 HTML 报告,这条命令的背后实际上主要执行了以下两个步骤:

  1. 在有了编译和运行时候生成的 .gcno.gcda 文件后,执行命令 gcov main.c foo.c 即可生成 .gcov 代码覆盖率文件。

  2. 有了代码覆盖率 .gcov 文件,通过 LCOV 生成可视化代码覆盖率报告。

生成 HTML 结果报告的步骤如下:

# 1. 生成 coverage.info 数据文件
lcov --capture --directory . --output-file coverage.info
# 2. 根据这个数据文件生成报告
genhtml coverage.info --output-directory out

删除所有生成的文件

上传过程中所有生成的文件可通过执行 make clean 命令来彻底删除掉。

点击查看 make clean 命令的输出
sh-4.2$ make clean
rm -rf main *.o *.so *.gcno *.gcda *.gcov coverage.info out

代码覆盖率报告

index

首页以目录结构显示

example

进入目录后,显示该目录下的源文件

main.c

蓝色表示这些语句被覆盖

foo.c

红色表示没有被覆盖的语句

LCOV 支持语句、函数和分支覆盖度量。

旁注:

  • 还有另外一个生成 HTML 报告的工具叫 gcovr,使用 Python 开发的,它的报告在显示方式上与 LCOV 略有不同。比如 LCOV 以目录结构显示, gcovr 以文件路径来显示,前者与代码结构一直因此我更倾向于使用前者。

相关阅读

SonarQube installation and troubleshootings

Backgroud

In my opinion, SonarQube is not a very easy setup DevOps tool to compare with Jenkins, Artifactory. You can’t just run some script under the bin folder to let the server boot up.

You must have an installed database, configuration LDAP in the config file, etc.

So I’d like to document some important steps for myself, like setup LDAP or PostgreSQL when I install SonarQube of v9.0.1. It would be better if it can help others.

Prerequisite and Download

  1. Need to be installed JRE/JDK 11 on the running machine.

    Here is the prerequisites overview: https://docs.sonarqube.org/latest/requirements/requirements/

  2. Download SonarQube: https://www.sonarqube.org/downloads/

    cd sonarqube/
    ls
    wget https://binaries.sonarsource.com/Distribution/sonarqube/sonarqube-9.0.1.46107.zip

    unzip sonarqube-9.0.1.46107.zip
    cd sonarqube-9.0.1.46107/bin/linux-x86-64
    sh sonar.sh console

Change Java version

I installed SonarQube on CentOS 7 machine, the Java version is OpenJDK 1.8.0_242 by default, but the prerequisite shows at least need JDK 11. There is also JDK 11 available on my machine, so I just need to change the Java version.

I recommend using the alternatives command change Java version,refer as following:

$ java -version
openjdk version "1.8.0_242"
OpenJDK Runtime Environment (build 1.8.0_242-b08)
OpenJDK 64-Bit Server VM (build 25.242-b08, mixed mode)

$ alternatives --config java

There are 3 programs which provide 'java'.

Selection Command
-----------------------------------------------
1 java-1.7.0-openjdk.x86_64 (/usr/lib/jvm/java-1.7.0-openjdk-1.7.0.251-2.6.21.1.el7.x86_64/jre/bin/java)
*+ 2 java-1.8.0-openjdk.x86_64 (/usr/lib/jvm/java-1.8.0-openjdk-1.8.0.242.b08-1.el7.x86_64/jre/bin/java)
3 java-11-openjdk.x86_64 (/usr/lib/jvm/java-11-openjdk-11.0.12.0.7-0.el7_9.x86_64/bin/java)

Enter to keep the current selection[+], or type selection number: 3
$ java -version
openjdk version "11.0.12" 2021-07-20 LTS
OpenJDK Runtime Environment 18.9 (build 11.0.12+7-LTS)
OpenJDK 64-Bit Server VM 18.9 (build 11.0.12+7-LTS, mixed mode, sharing)

Install Database

SonarQube needs you to have installed a database. It supports several database engines, like Microsoft SQL Server, Oracle, and PostgreSQL. Since PostgreSQL is open source, light, and easy to install, so I choose PostgreSQL as its database.

How to download and install PostgreSQL please see this page: https://www.postgresql.org/download/linux/redhat/

Troubleshooting

1. How to establish a connection with SonarQube and PostgreSQL

Please refer to the sonar.properties file at the end of this post.

2. How to setup LDAP for users to log in

sonar.security.realm=LDAP
ldap.url=ldap://den.exmaple-org:389
ldap.bindDn=user@exmaple-org.com
ldap.bindPassword=mypassword
ldap.authentication=simple
ldap.user.baseDn=DC=exmaple-org,DC=com
ldap.user.request=(&(objectClass=user)(sAMAccountName={login}))
ldap.user.realNameAttribute=cn
ldap.user.emailAttribute=email

3. How to fix LDAP login SonarQube is very slowly

Comment out ldap.followReferrals=false in sonar.properties file would be help.

Related post: https://community.sonarsource.com/t/ldap-login-takes-2-minutes-the-first-time/1573/7

4. How to fix ‘Could not resolve 11 file paths in lcov.info’

I want to display Javascript code coverage result in SonarQube, so I added sonar.javascript.lcov.reportPaths=coverage/lcov.info to the sonar-project.properties

But when I run sonar-scanner.bat in the command line, the code coverage result can not show in sonar. I noticed the following error from the output:

INFO: Analysing [C:\workspace\xvm-ide\client\coverage\lcov.info]
WARN: Could not resolve 11 file paths in [C:\workspace\xvm-ide\client\coverage\lcov.info]

There are some posts related to this problem, for example, https://github.com/kulshekhar/ts-jest/issues/542, but no one works in my case.

# here is an example error path in lcov.info
..\src\auto-group\groupView.ts

Finally, I have to use the sed command to remove ..\ in front of the paths before running sonar-scanner.bat, then the problem was solved.

sed -i 's/\..\\//g' lcov.info

Please comment if you can solve the problem with changing options in the tsconfig.json file.

4. How to output to more logs

To output more logs, change sonar.log.level=INFO to sonar.log.level=DEBUG in below.

Note: all above changes of sonar.properties need to restart the SonarQube instance to take effect.

Final sonar.properties

For the sonar.properties file, please see below or link

Read More

How to fix "hidden symbol `__gcov_init' in ../libgcov.a(_gcov.o) is referenced by DSO"

Problem

When we introduced Gocv to build my project for code coverage, I encountered the following error message:

error 1

g++     -m64 -z muldefs -L/lib64 -L/usr/lib64 -lglib-2.0 -m64 -DUV_64PORT -DU2_64_BUILD -fPIC -g  DU_starter.o
NFA_msghandle.o NFA_svr_exit.o du_err_printf.o -L/workspace/code/myproject/src/home/x64debug/bin/
-L/workspace/code/myproject/src/home/x64debug/bin/lib/ -lundata -lutcallc_nfasvr
-Wl,-rpath=/workspace/code/myproject/src/home/x64debug/bin/ -Wl,-rpath=/.dulibs28 -Wl,--enable-new-dtags
-L/.dulibs28 -lodbc -lm -lncurses -lrt -lcrypt -lgdbm -ldl -lpam -lpthread -ldl -lglib-2.0
-lstdc++ -lnsl -lrt -lgcov -o /workspace/code/myproject/src/home/x64debug/objs/du/share/dutsvr
/usr/bin/ld: /workspace/code/myproject/src/home/x64debug/objs/du/share/dutsvr:
hidden symbol `__gcov_init' in /usr/lib/gcc/x86_64-redhat-linux/4.8.5/libgcov.a(_gcov.o) is referenced by DSO

error 2

It may also be such an error

/home/p7539c/cutest/CuTest.c:379: undefined reference to `__gcov_init'
CuTest.o:(.data+0x184): undefined reference to `__gcov_merge_add'

Positioning problem

Let’s take the error 1.

From the error message, I noticed -lundata -lutcallc_nfasvr are all the linked libraries (-llibrary)

I checked libraries undata and utcallc_nfasvr one by one, and found it displayed U __gcov_init and U means undefined symbols.

Use the find command to search the library and the nm command to list symbols in the library.

-sh-4.2$ find -name *utcallc_nfasvr*
./bin/libutcallc_nfasvr.so
./objs/du/work/libutcallc_nfasvr.so
-sh-4.2$ nm ./bin/libutcallc_nfasvr.so | grep __gcov_init
U __gcov_init

How to fix

In my case, I just added the following code LIB_1_LIBS := -lgcov to allow the utcallc_nfasvr library to call gcov.

LIB_1 := utcallc_nfasvr
# added below code to my makefile
LIB_1_LIBS := -lgcov

Rebuild, the error is gone, then checked library, it displayed t __gcov_init this time, it means symbol value exists not hidden.

-sh-4.2$ nm ./bin/libutcallc_nfasvr.so | grep __gcov_init
t __gcov_init

Or in your case may build a shared library like so, similarly, just add the compile parameter -lgcov

g++   -shared -o libMyLib.so src_a.o src_b.o src_c.o -lgcov

Summary

I have encountered the following problems many times

undefined reference to `__gcov_init'

undefined reference to `__gcov_merge_add'

`hidden symbol `__gcov_init' in /usr/lib/gcc/x86_64-redhat-linux/4.8.5/libgcov.a(_gcov.o) is referenced by DSO`

Each time I can fix it by adding -glcov then recompile. the error has gone after rebuild. (you use the nm command to double-check whether the symbol has been added successfully.)

Hopes it can help you.

Add or update Bitbucket build status with REST API

Backgorud

  1. When you want to add build status to your Bitbucket the specific commit of a branch when you start a build from the branch

  2. When the build status is wrong, you want to update it manually. for example, update build status from FAILED to SUCCESSFUL

You can call Bitbucket REST API to do these.

Code snippet

Below is the code snippet to update Bitbucket build status with REST API in the shell script.

The code on GitHub Gist: https://gist.github.com/shenxianpeng/bd5eddc5fb39e54110afb8e2e7a6c4fb

Click Read More to view the code here.

Read More

关于代码覆盖率 (About Code Coverage)

本篇简要介绍:什么是代码覆盖率?为什么要做代码覆盖率?代码覆盖率的指标、工作原理,主流的代码覆盖率工具以及不要高估代码覆盖率指标。

什么是代码覆盖率?

代码覆盖率是对整个测试过程中被执行的代码的衡量,它能测量源代码中的哪些语句在测试中被执行,哪些语句尚未被执行。

为什么要测量代码覆盖率?

众所周知,测试可以提高软件版本的质量和可预测性。但是,你知道你的单元测试甚至是你的功能测试实际测试代码的效果如何吗?是否还需要更多的测试?

这些是代码覆盖率可以试图回答的问题。总之,出于以下原因我们需要测量代码覆盖率:

  • 了解我们的测试用例对源代码的测试效果
  • 了解我们是否进行了足够的测试
  • 在软件的整个生命周期内保持测试质量

注:代码覆盖率不是灵丹妙药,覆盖率测量不能替代良好的代码审查和优秀的编程实践。

通常,我们应该采用合理的覆盖目标,力求在代码覆盖率在所有模块中实现均匀覆盖,而不是只看最终数字的是否高到令人满意。

举例:假设代码覆盖率只在某一些模块代码覆盖率很高,但在一些关键模块并没有足够的测试用例覆盖,那样虽然代码覆盖率很高,但并不能说明产品质量就很高。

代码覆盖率的指标种类

代码覆盖率工具通常使用一个或多个标准来确定你的代码在被自动化测试后是否得到了执行,常见的覆盖率报告中看到的指标包括:

  • 函数覆盖率:定义的函数中有多少被调用
  • 语句覆盖率:程序中的语句有多少被执行
  • 分支覆盖率:有多少控制结构的分支(例如if语句)被执行
  • 条件覆盖率:有多少布尔子表达式被测试为真值和假值
  • 行覆盖率:有多少行的源代码被测试过

代码覆盖率是如何工作的?

代码覆盖率测量主要有以下三种方式:

1. Source code instrumentation - 源代码检测

将检测语句添加到源代码中,并使用正常的编译工具链编译代码以生成检测的程序集。这是我们常说的插桩,Gcov 是属于这一类的代码覆盖率工具。

2. Runtime instrumentation - 运行时收集

这种方法在代码执行时从运行时环境收集信息以确定覆盖率信息。以我的理解 JaCoCo 和 Coverage 这两个工具的原理属于这一类别。

3. Intermediate code instrumentation - 中间代码检测

通过添加新的字节码来检测编译后的类文件,并生成一个新的检测类。说实话,我 Google 了很多文章并找到确定的说明哪个工具是属于这一类的。

了解这些工具的基本原理,结合现有的测试用例,有助于正确的选择代码覆盖率工具。比如:

  • 产品的源代码只有 E2E(端到端)测试用例,通常只能选择第一类工具,即通过插桩编译出的可执行文件,然后进行测试和结果收集。
  • 产品的源代码有单元测试用例,通常选择第二类工具,即运行时收集。这类工具的执行效率高,易于做持续集成。

当前主流代码覆盖率工具

代码覆盖率的工具有很多,以下是我用过的不同编程语言的代码覆盖率工具。在选择工具时,力求去选择那些开源、流行(活跃)、好用的工具。

编程语言 代码覆盖率工具
C/C++ Gcov
Java JaCoCo
JavaScript Istanbul
Python Coverage.py
Golang cover

不要高估代码覆盖率指标

代码覆盖率不是灵丹妙药,它只是告诉我们有哪些代码没有被测试用例“执行到”而已,高百分比的代码覆盖率不等于高质量的有效测试。

首先,高代码覆盖率不足以衡量有效测试。相反,代码覆盖率更准确地给出了代码未被测试程度的度量。这意味着,如果我们的代码覆盖率指标较低,那么我们可以确定代码的重要部分没有经过测试,然而反过来不一定正确。具有高代码覆盖率并不能充分表明我们的代码已经过充分测试。

其次,100% 的代码覆盖率不应该是我们明确努力的目标之一。这是因为在实现 100% 的代码覆盖率与实际测试重要的代码之间总是需要权衡。虽然可以测试所有代码,但考虑到为了满足覆盖率要求而编写更多无意义测试的趋势,当你接近此限制时,测试的价值也很可能会减少。

借 Martin Fowler 在这篇测试覆盖率的文章说的一句话:

代码覆盖率是查找代码库中未测试部分的有用工具,然而它作为一个数字说明你的测试有多好用处不大。

参考

https://www.lambdatest.com/blog/code-coverage-vs-test-coverage/
https://www.atlassian.com/continuous-delivery/software-testing/code-coverage
https://www.thoughtworks.com/insights/blog/are-test-coverage-metrics-overrated