准备工作#
- 申请 免费试用许可 并安装
- 会收到包含用户名/密码的邮件,用于登录下载。
- 本文测试环境为 Windows,因此下载并安装 Windows 版本的 Squish Coco 及其 VS 插件。
- 安装 Visual Studio 2010 及以上版本(本文使用 VS2017 Professional)。
安装 VS 插件#
进入 ..squishcoco\Setup 目录,双击 SquishCocoVSIX2017.vsix,重新打开 VS2017 后即可看到插件入口。
创建示例项目#
- 在 Visual Studio 中选择 File → New → Project…
- 选择 Visual C++ → Win32 Console Application 模板。
- 项目命名为
squishcoco_sample,点击 OK → Finish。
此时程序尚未插桩,需要为构建添加新的配置。
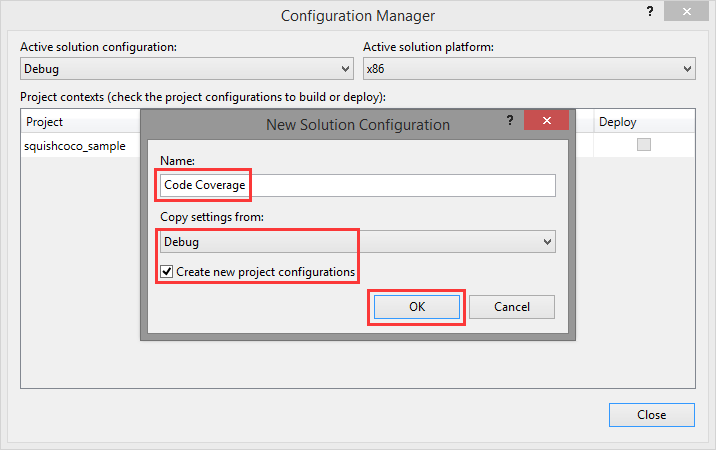
- 打开 Build → Configuration Manager…
- 在 Configuration 列点击 New…
- 在 New Project Configuration 窗口中:
- Name 填写
Code Coverage - Copy settings from 选择
Release或Debug - 点击 OK
- Name 填写
添加测试代码#
squishcoco_sample.cpp
#include "stdafx.h"
extern int myprint();

int _tmain(int argc, _TCHAR* argv[]) {
    int age;
    printf("Enter your age: ");
    scanf("%d", &age);
    if (age > 0 && age <= 40)
        printf("You're young guys\n");
    else if (age > 40 && age <= 70)
        printf("You're midle guys\n");
    else if (age > 70 && age <= 100)
        printf("You're old guys\n");
    else
        printf("You're awesome\n");

    myprint();
    return 0;
}
myprint.cpp
#include "stdafx.h"

int myprint() {
    printf("you have call printf function\n");
    return 0;
}
启用代码覆盖率插桩#
使用 VS 插件:
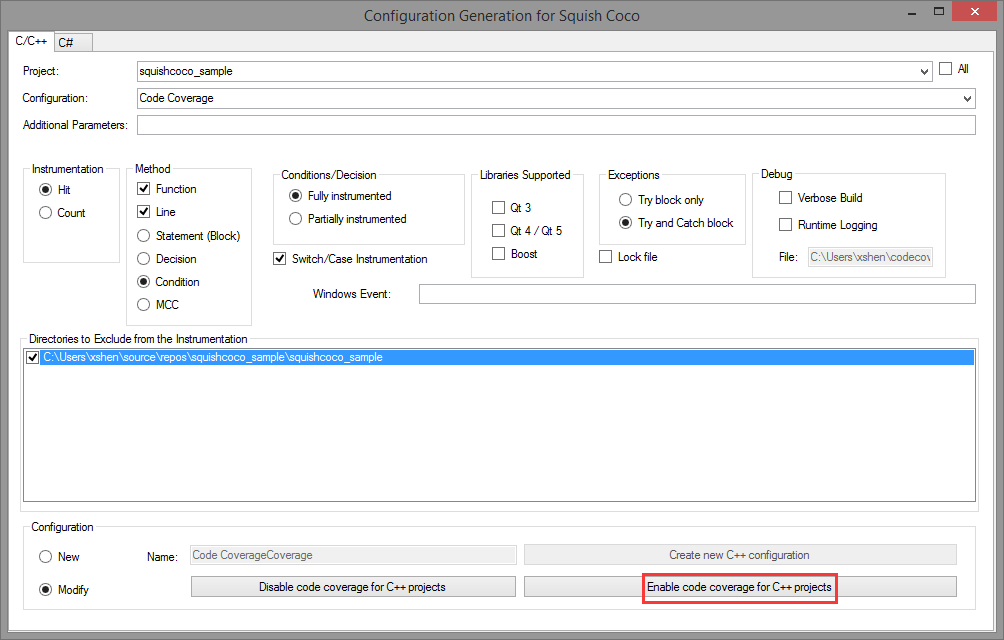
- 点击 Tools → Code Coverage Build Mode…
- Project 选择
squishcoco_sample - Configuration 选择
Code Coverage - 底部选择 Modify → 点击 Enable code coverage for C++ projects
执行后,SquishCoco 会在输出窗口显示对编译器、链接器等附加的参数配置。
构建项目#
构建后会生成:
- 可执行文件
squishcoco_sample.exe - 插桩信息文件
squishcoco_sample.exe.csmes
双击 .csmes 文件会在 CoverageBrowser 中打开,此时因未运行程序,所有插桩行会显示为灰色。
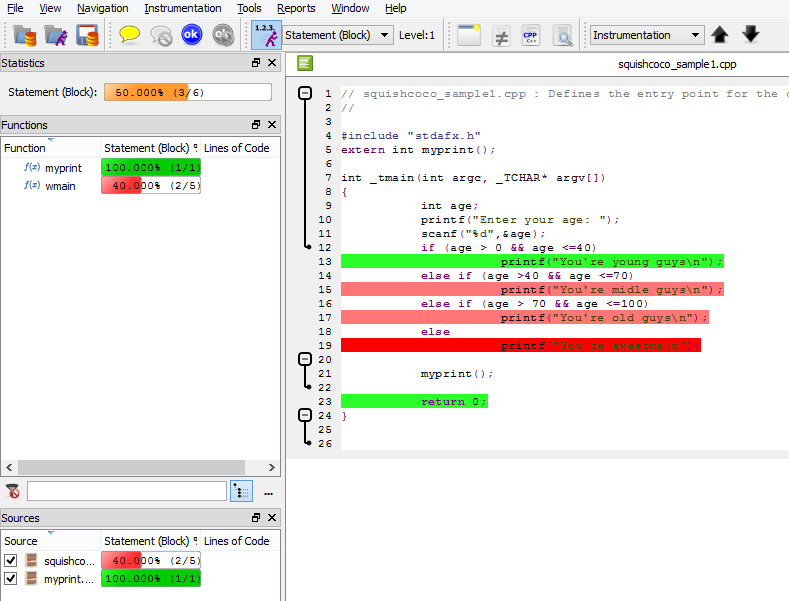
收集和查看覆盖率结果#
双击运行
squishcoco_sample.exe,会生成squishcoco_sample.exe.csexe覆盖率快照文件。在 CoverageBrowser 中:
- 点击 File → Load Execution Report…
- 选择快照文件并 Import
代码窗口中已执行的行会以绿色高亮显示。
最终结果示例#