In my previous article on Code Signing, I mentioned GaraSign, another code signing tool I use at work.
Given the limited Chinese resources on GaraSign, this article will introduce some practical aspects of GaraSign, hoping it will be helpful to you.
Code Signing#
Let’s reiterate what code signing is. Code signing certificates are used to digitally sign applications, drivers, executables, and software programs. This allows customers to verify that the code they receive has not been tampered with or corrupted by cybercriminals and hackers. The signed delivery product combines an encryption token and a certificate, allowing users to verify it before installation. Code signing confirms the software author’s identity and proves that the code has not been modified or tampered with after signing.
Garasign Solution#
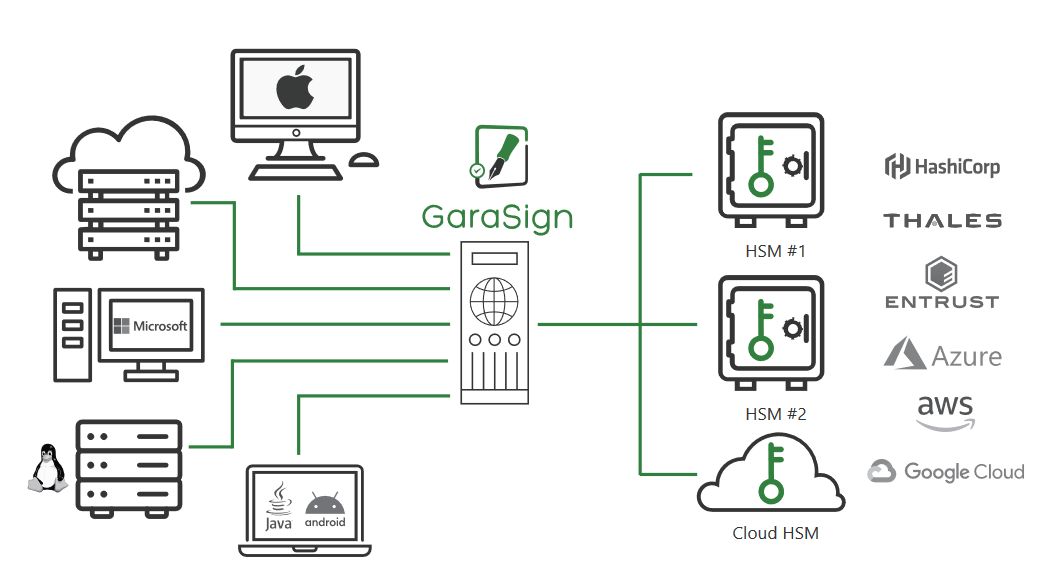
GaraSign is a SaaS-based security orchestration platform that allows for centralized management of enterprise infrastructure, services, and data. GaraSign integrates with native clients for all major operating systems, platforms, and tools, ensuring that existing workflows are not disrupted while improving their overall security posture and compliance.
GaraSign consists of the following components:#
- Encryption Token — An encrypted device that stores signing keys (typically one or more HSMs — Hardware Security Modules)
- GaraSign Signing Server — A REST server located in front of the encryption token that stores the signing keys
- GaraSign Signing Client — A client that allows integrating signing tools to locally hash data and offload signature generation to the GaraSign Signing server.

Garasign code signing hashing method — significantly improves speed

Installing GaraSign#
I won’t go into detail about installing GaraSign here; you can find relevant installation documentation on the official website. Note that GaraSign currently has high operating system version requirements, such as:
- Windows minimum requirement is Windows 2019, Win10 and Win11
- Linux minimum requirement is RHEL 7.9, 8.0, 9.0, CentOS 7.9, 8.0, 9.0, Rocky 8.0
If your build environment is older or doesn’t meet the supported versions, I recommend setting up a dedicated GaraSign machine (Linux recommended), as I did.
If you use Jenkins for building, you can set this machine as a Jenkins agent. By creating a Jenkins pipeline, all packages requiring publication can be signed through this pipeline.
How to Sign Independently#
If you have set up the GaraSign environment, for example, on Linux, you can use the following command to sign.
Note: The commands used to sign different file types vary between Windows and Linux; therefore, signing on Linux is recommended for simplicity.
openssl dgst -sign <private key file> -keyform PEM -sha256 -out <signature-file-name.sig> -binary <binary file to sign>
Specific Implementation#
Assuming your artifacts are stored on Artifactory, here’s a Jenkins example of an automated signing pipeline:
- Download the artifacts to be signed from Artifactory
- Sign using GaraSign
- Verify GaraSign success
- Upload the signature file and public key to the same directory on Artifactory
pipeline{

	agent {
        node {
            label 'garasign'
        }
    }

    parameters {
        string(
            name: 'REPO_PATH',
            defaultValue: '',
            summary: 'Repository Path on Artifactory. eg. generic-stage/test_repo/devel/54/mybuild_1.1.0_752d0821_64bit.exe'
        )
    }

    environment {
		BOT   = credentials("BOT-credential")
		ART_URL = "https://my.org.com/artifactory"
    }

    stages {
        stage('GaraSign'){
            steps {
				script {
					if (! params.REPO_PATH){
						error "REPO_PATH can not empty, exit!"
					}
					// Update Job description
					def manualTrigger = true
					currentBuild.upstreamBuilds?.each { b ->
						currentBuild.description = "Triggered by: ${b.getFullDisplayName()}\n${REPO_PATH}"
						manualTrigger = false
					}
					if (manualTrigger == true) { currentBuild.description = "Manual sign: ${REPO_PATH}" }

					sh '''
					# download artifacts
					curl -u${BOT_USR}:${BOT_PSW} -O ${ART_URL}/${REPO_PATH}
					file_name=$(basename ${REPO_PATH})
					repo_folder=$(dirname ${REPO_PATH})

					# garasign
					openssl dgst -sign grs.privkey.pem -keyform PEM -sha256 -out $file_name.sig -binary $file_name

					# verify
					grs.pem.pub.key
					output=$(openssl dgst -verify grs.pem.pub.key -keyform PEM -sha256 -signature $file_name.sig -binary $file_name)
					if echo "$output" | grep -q "Verified OK"; then
						echo "Output is Verified OK"
					else
						echo "Output is not Verified OK"
						exit 1
					fi

					# upload signature file (.sig) and public key (.pem.pub.key)
					curl -u${BOT_USR}:${BOT_PSW} -T $file_name.sig  ${ART_URL}/${repo_folder}/
					curl -u${BOT_USR}:${BOT_PSW} -T grs.pem.pub.key ${ART_URL}/${repo_folder}/
					'''
				}
            }
        }
    }
}
How to Verify an Independent Signature#
Again, using Linux as an example, the following command can be used to verify the signature.
openssl dgst -verify <public key file> -signature <signature> <file to verify>
Once your artifacts have been signed, when providing them to customers, you need to provide not only the published package but also the signature file (.sig) and the public key (.pem.pub.key).
For example, the following CLI product provides installation packages for Windows, Linux, and AIX platforms. Customers can refer to the following for signature verification.
# Download the installation package, signature file, and public key
$ ls
cli.pem.pub.key  CLI_AIX_1.1.0.zip  CLI_AIX_1.1.0.zip.sig  CLI_LINUXX86_1.1.0.zip  CLI_LINUXX86_1.1.0.zip.sig  CLI_WINDOWS_1.1.0.zip  CLI_WINDOWS_1.1.0.zip.sig

# Verify the signature
openssl dgst -verify cli.pem.pub.key -signature CLI_AIX_1.1.0.zip.sig CLI_AIX_1.1.0.zip
Verified OK

openssl dgst -verify cli.pem.pub.key -signature CLI_LINUXX86_1.1.0.zip.sig CLI_LINUXX86_1.1.0.zip
Verified OK

openssl dgst -verify cli.pem.pub.key -signature CLI_WINDOWS_1.1.0.zip.sig CLI_WINDOWS_1.1.0.zip
Verified OK

# Verification fails when the package and signature file do not match
openssl dgst -verify cli.pem.pub.key -signature CLI_AIX_1.1.0.zip.sig CLI_LINUXX86_1.1.0.zip
Verification Failure
This concludes the GaraSign implementation sharing. For any questions or suggestions, please leave a comment.
Please indicate the author and source when reprinting this article, and do not use it for any commercial purposes. Welcome to follow the WeChat official account “DevOps攻城狮”.

